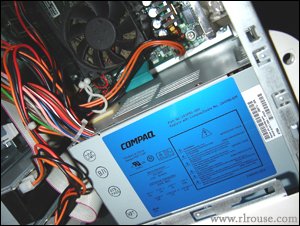
 To be sure, the power supply is one of the most critical components inside your PC’s case. In fact, when the power supply quits working everything else quits working right along with it. If you suspect that the power supply in your PC might be defective, this article will explain how to replace it with a new one.
First, you need to determine if the power supply is indeed defective. Without a power supply tester or enough knowledge to be able to check one with a voltmeter, there is no way to be absolutely certain that the power supply is really bad – but you can get a pretty good idea. Here’s a quick and dirty test:
1 – Is the power supply’s fan running? If not, verify that the computer is plugged in to a working electrical outlet and turned on. If the PC is getting power but the fan isn’t turning that’s the first clue that the power supply might be defective.
2 – Are there any sounds coming from inside the PC such as the whir of a hard drive or noise from the CPU fan? If not, that’s clue #2.
3 – Are any of the LED’s on the system unit or keyboard lit up? If not, that’s clue #3.
If the answer to each of these 3 questions is no, the odds are great that the power supply is indeed the problem. If so, here are the steps for replacing it:
1 – Disconnect the PC’s power cord from the wall outlet and then from the back of the computer.
2 – Remove the access cover to the PC and connect an anti-static wrist strap between your wrist and a metal part of the computer chassis. You can purchase an anti-static wrist strap at Radio Shack or most any computer store.
3 – Locate the power supply. It will be a large metal box with a couple of bundles of wires coming out of it. You can also locate it by looking at the back of the computer case. The power supply is the box that the power cord plugs into.
4 – If possible, take good clear photographs of all the power supply connections BEFORE disconnecting anything. Then disconnect one cable at a time and mark it with a piece of masking tape. Unplug each power supply cable one at at time, labeling them AND the connectors they plug into with numbers starting with “1”. Make sure that you mark BOTH connectors and that the masking tape is securely fixed so that it won’t fall off.
5 – After all the cables have been disconnected and labeled, remove the screws on the back of the PC that fasten the power supply to the case. There are usually 4 of them on most PC’s. Store the screws in a safe place.
6 – Lift the power supply out of the case. You might have to remove other parts such as disk drives or expansion cards in order to do this. If so, a good, clear photograph might come in handy when you re-install them later.
7 – Take the power supply to your local computer store and ask them for a replacement. Alternatively, you can order one online. In either case, make sure you have your PC’s model number handy because you’ll probably need it. Note: Since you’re replacing the power supply anyway, I recommend getting one with a higher wattage capacity than the original. Everything you add to a PC drains more current from the power supply, so more is always better in regards to wattage.
8 – Install the new power supply into the PC by reversing steps 1 through 6 above.
That’s all there is to it! Hopefully your PC will boot right up and you’ll be good to go. If not, it’s time to take the system to your local computer repair shop and have it checked out by a pro.
About the author: Rick Rouse is the owner of RLROUSE.COM. He is also an A+ Certified Computer technician with over 30 years in the industry.